使用jcenter发布jar包

传说使用maven库发布jar包是一件非常麻烦的事情,安卓的gradle构建已经默认使用了jcenter,而且现在很多jar包只在jcenter上有,在maven上面没有,因此开始尝试使用jcenter来代替maven。

也许是习惯问题,感觉jcenter的搜索功能感觉很糟糕,没有 http://search.maven.org/ 这么方便,搜出来的结果乱七八糟的一大堆,暂时还是只用jcenter来下载和上传jar包,搜索包及版本还是在maven上面进行。国内的网络访问jcenter比maven要快不少。

使用jcenter来下载依赖包非常简单,在gradle脚本中,将全部 mavenCentral() 的地方改成jcenter()就可以了。

主要来说说将自己的包打包上传到jcenter的流程。

进入https://bintray.com/,注册一个账号,bintray支持很多第三方账号登陆,不论是用那种方式登陆,都建议关联一下自己的github账号,因为后面申请将自己的jar包投放到jcenter时,管理员会让你提供一些信息来证明你拥有该jar包代码的贡献者权限。

Can you please provide an online reference showing you’re a contributor to this project? Thanks, Bintray Team。

注册完成后,进入自己的maven库,创建一个新的package,填写详细的package信息,最好能在github上面有项目地址,申请发布到jcenter时会方便很多。

bintray项目截图


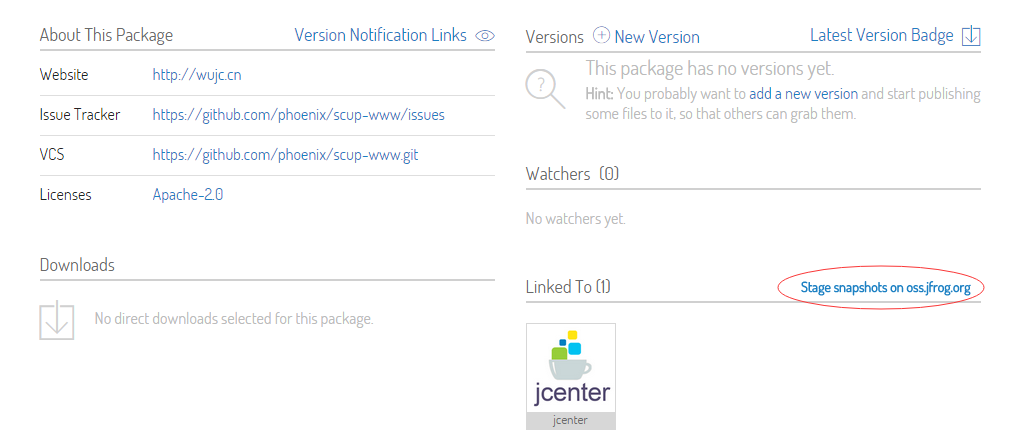
Package创建后,上图红色圈起来的部分是 Add to JCenter的按钮 ,点击申请将该包添加到jcenter,否则上传上去的内容别人不能通过jcenter()来下载到。

Request to include the package in jcenter


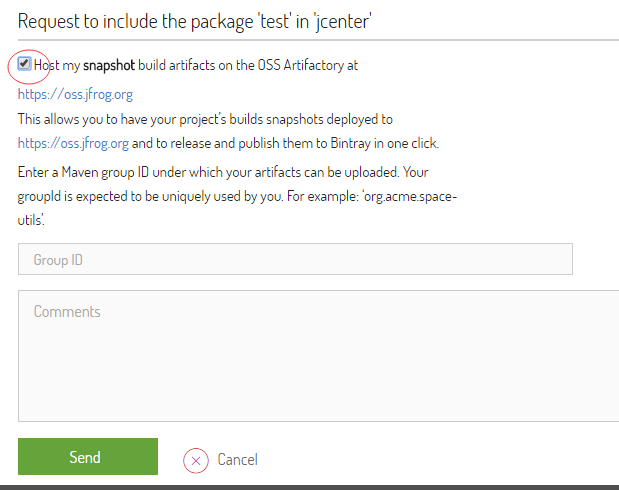
jcenter是不提供snapshot版本发布的,如果需要托管snapshot版本,需要在申请时勾上“Host my snapshot build artifacts on the OSS Artifactory at”的选项,这样审核通过后,可以使用bintray的账号登陆https://oss.jfrog.org,并且可以将snapshot版本托管到jfrog。

接下来就等待bintray工作人员的审核了,由于时区不同,他们审核最长可能需要大半天时间。等待审核的这段时间可以先写写发布脚本。

apply plugin: 'maven-publish'
apply plugin: "com.jfrog.bintray"
apply plugin: "com.jfrog.artifactory"
//通过该插件,生出来的pom.xml文件依赖项中才会有<optional>true</optional>的选项
apply plugin: 'optional-base' 
buildscript {
    repositories {
        jcenter()
    }
    dependencies {
        classpath "com.jfrog.bintray.gradle:gradle-bintray-plugin:1.2"
        classpath "org.jfrog.buildinfo:build-info-extractor-gradle:3.1.1"
        classpath 'com.netflix.nebula:gradle-extra-configurations-plugin:2.2.+'
    }
}

allprojects {
    apply plugin: 'java'
    repositories {
        jcenter()
    }
}

task sourceJar(type: Jar) {
    classifier = 'sources'
    from sourceSets.main.allJava
}

publishing {
    publications {
        mavenJava(MavenPublication) {
            from components.java
            artifact sourceJar
        }
    }
}
Properties properties = new Properties()
properties.load(new FileInputStream("${System.properties['user.home']}/bintray.properties"))
artifactory {
    contextUrl = 'http://oss.jfrog.org/artifactory'
    resolve {
        repository {
            repoKey = 'libs-release'
        }
    }
    publish {
        repository {
            repoKey = 'oss-snapshot-local' //The Artifactory repository key to publish to
            username =  properties.getProperty("bintray.user")
            password = properties.getProperty("bintray.apikey")
            maven = true
        }
        defaults {
//这里的名字和上面红色的名字一致即可,会将其包含的输出上传到jfrog上去
            publications('mavenJava')
            publishArtifacts = true
        }
    }
}
bintray {
    user = properties.getProperty("bintray.user")
    key = properties.getProperty("bintray.apikey")
    publications('mavenJava')
    pkg {
        repo = "maven"
        name = "java-utils"	//发布到JCenter上的项目名字
        websiteUrl = "http://wujc.cn"
        licenses = ["Apache-2.0"]
        publish = true
    }
}

dependencies {
    compile "org.jasig.cas.client:cas-client-core:3.2.1"
    compile "org.apache.shiro:shiro-cas:${shiroVersion}", optional
    compile "org.apache.shiro:shiro-spring:${shiroVersion}", optional
}

执行gradle artifactoryPublish就可以发布到oss.jfrog.org上去了。

gradle可以通过这种方式下载到发布的snapshot包:

maven { url "http://oss.jfrog.org/oss-snapshot-local/" }

域名切换后wordpress需要做的相应改动

以前买了一个索马里的域名,88元/年,价格还算厚道,忽然so域名的注册局变了,移交给了海盗当局,以后续费就要350一年了,考虑了一下,决定还是重新申请一个cn的域名用用。虽然网站几乎还没什么流量,但是毕竟搜索引擎已经有收录了,因此还是得做一些域名切换的操作。

WordPress:

登陆管理后台,在设置中,将WordPress地址设置为新的域名。

百度sitemap插件中,将系统安装的URL路径重新校验为新的域名。

百度站长工具:

在百度站长工具中新增新的域名,否则百度sitemap插件会停止提交站内索引。

百度统计:

如果用了百度统计,需要在百度统计中新增站点,并在wordpress中更新站点统计JS代码。

Nginx:

1、将以前配置中的server_name修改为新的域名:

server_name  wujc.cn www.wujc.cn;

2、增加一个server节点,用来配置老的域名并重定向到新的域名:

server {
    listen       80;
    server_name  wjc.so www.wjc.so;

    location / {
        rewrite ^/(.*) http://wujc.cn/$1 permanent;
    }
}

重新加载nginx即可,至此所有搜索引擎中老域名过来的请求都会被重新定向到新域名。传说聪明的搜索引擎检测到后会逐渐自动将老的域名PR值切换到新的域名去,不过没有验证过,但是Google很快会自动收录新域名的内容,百度不会很快主动收录。

WordPress 添加统计代码两种方法

有两种方法可以添加统计代码

1、可以直接修改footer.php文件
或者在你的functions.php文件中添加一个函数挂载到页脚中执行。
下面我们来分别演示一下:

修改footer.php文件添加统计代码

找到页脚文件(footer.php)中标签的位置,并在其之前直接添加你获得的统计代码。
functions.php中添加函数并挂载到页脚中执行
将如下的代码添加到functions.php最后

 代码如下
function add_tj_code(){ ?>
//这里天加上你的统计代码
<?php }

add_action

这种方法会有一个问题,就是换了网站皮肤,或者升级了皮肤版本后,统计代码就丢失了,又得重新设置一次。

2、在小工具中添加统计代码

这是一种最简单的方法,由于百度统计的JS使用了异步加载,因此虽然小工具一般都在页面的侧边栏中,但是统计代码的加载不会对页面加载速度造成太大的影响。
在 仪表盘->外观->小工具中,将文本小工具拖动至小工具区域中,

小工具-html

将统计代码添加在其中

Java 8: Replace traditional for loops with IntStreams

I’ve previously looked at how to work on a higher level by replacing loops with streams. In this post I want to continue this by looking at IntStream and how it could replace the traditionalfor (int i=0;... loop.

IntStream is a stream of primitive int values. It’s part of the java.util.stream package, and you can find a lot of the same functions there as in the normal Stream<T>. There also exists streams for dealing with double and long primitives, but we’ll leave that out since it acts in pretty much the same way.

Creating the IntStream

There are several ways of creating an IntStream.

Let’s start by looking at the of function.

IntStream.of(1, 2, 3);  
// > 1, 2, 3

of just takes an arbitrary number of ints, creating an IntStream based on them.

Usually we don’t want to list up all the ints like this, so let’s instead continue by looking at two functions that probably will be used most of the time.

IntStream.range(1, 3);  
// > 1, 2
IntStream.rangeClosed(1, 3);  
// > 1, 2, 3

With rangeand rangeClosed, we define a range of ints that we want to create a stream of.

As you probably guessed from the resulting streams, the rangeClosed function includes the ending int, while range excludes it.

Now what if we don’t want all the ints within a range? What if we just want every even number?

Then we could use the iterator function.

IntStream.iterate(0, i -> i + 2).limit(3);  
// > 0, 2, 4

With iterator we can define a start value and a function that will calculate the next ints based on the previous element.

iterator creates an infinite stream, so I’ve used limit to create a stream containing just three elements.

The last function we’re going to cover for creating IntStreams, is the generate function.

IntStream.generate(() -> ThreadLocalRandom.current().nextInt(10)).limit(3);  
// > 4, 1, 7

generate looks a lot like iterator, but differ by not calculating the ints based on the previous element.

It simply takes an IntSupplier that will independently calculate the next int.

Working with the ints

Now that we have seen how we can create an IntStream, let’s start to play with it by using some of the functions it offer.

Let’s start by looking at the different map functions

First, let’s use the normal map function to find the squared value of all ints between 0 and 5.

IntStream.range(1, 5).map(i -> i * i);  
// > 1, 4, 9, 16

The map function maps to an IntStream, so what about when we want to return other types of streams?

Well, then we have dedicated map functions to handle these scenarios

Stream<Color> stream = IntStream.range(1, 5).mapToObj(i -> getColor(i));  

mapToObject will simply return a Stream of the type that the mapping returns.

Now, if you just want to convert an IntStream to a Stream<Integer>, there’s a dedicated function for this job called boxed.

Stream<Integer> stream = IntStream.range(1, 5).boxed();  

You’ll also find map functions that returns DoubleStream and LongStream.

DoubleStream stream = IntStream.range(1, 5).mapToDouble(i -> i);

LongStream stream = IntStream.range(1, 5).mapToLong(i -> i);  

Moving on, let’s try out some of the matching functions

Let’s start by using matchAny to confirm that a certain range contains at least one even number.

IntStream.range(1, 5).anyMatch(i -> i % 2 == 0);  
// > true

matchAny will check if a predicate holds for at least one of the elements in the stream.

We also have two other match functions, matchNone and matchAll, that should return false for this predicate.

IntStream.range(1, 5).allMatch(i -> i % 2 == 0);  
// > false

IntStream.range(1, 5).noneMatch(i -> i % 2 == 0);  
// > false

Great!

Let’s now use the filter function to filter all the even numbers, then confirm that the filter did it’s job by using allMatch to make sure all numbers are even. Let’s also use noneMatch to make sure we can’t find any odd numbers.

IntStream.range(1, 5)  
    .filter(i -> i % 2 == 0)
    .allMatch(i -> i % 2 == 0);
// > true

IntStream.range(1, 5)  
    .filter(i -> i % 2 == 0)
    .noneMatch(i -> i % 2 != 0);
// > true

IntStream contains functions for fetching the max and min value

IntStream.range(1, 5).max().getAsInt();  
// > 4
IntStream.range(1, 5).min().getAsInt();  
// > 1

Both these methods and a lot of the other functions that returns one element, will return anOptionalInt.

OptionalInt, like Optional, gives some great higher-order functions that are abstracting away the null checks. Since that’s not the topic of this post, we’ll just fetch the int value assuming it’s there.

IntStream also offers the excellent reduce function

IntStream.range(1, 5).reduce(1, (x, y) -> x * y)  
// > 24

Here we reduce the stream by multiplying all the elements.

Concurrency

Another great thing about the Stream API, is that you can work on elements in parallel.

Let’s say we have a heavy operation that we want to execute four times.

IntStream.range(1, 5).parallel().forEach(i -> heavyOperation());  

parallel will execute heavyOperation in parallel for all the elements in the stream. Thanks to thisparallel, we can potentially save a great amount of time, with very little effort.

常用的一些git操作

上传本地tag到服务器:    git push origin <tagname>
重定向仓库:git remote set-url origin
某个目录增加一个仓库:git remote add <repo_alias> git@*.com:~/repo/<repo_name>.git
放弃本地更改:git reset –hard
ssh协议checkout如果比较慢,可以尝试使用http(s)协议,而且可以指定http代理:
git config –global http.proxy http://127.0.0.1:1080
 

如果希望保留生产服务器上所做的改动,仅仅并入新配置项, 处理方法如下:

git stash

git pull

git stash pop

然后可以使用git diff -w +文件名 来确认代码自动合并的情况.

将本地项目纳入远程git:
git init
git remote add origin xxx
git pull
git add *
git reset –hard
git checkout dev
如果项目提交的用户名和全局设置不一致,需要单独设置项目提交用户名:
git config –local user.name xxx
git config –local user.email xxx

411 错误:

error: RPC failed; result=22, HTTP code = 411
fatal: The remote end hung up unexpectedly

这个错误是因为是由于上传的包过大 HTTP 的头出错导致的。

解决方法

需要设置http.postBuffer,设置为50MB就可以了

git config http.postBuffer 524288000
搭建git服务:
useradd git(ubuntu下可以使用adduser git)
su - git
mkdir repo
mkdir .ssh
chmod 700 .ssh
cd repo
git init --bare <reponame>.git
cd ../.ssh
vim authorized_keys2 添加自己的公钥
chmod 600 authorized_keys2
windows环境下在cmd中 mkdir .ssh,然后把私钥复制到.ssh目录,文件名为id_rsa,如果复制到用户的工作目录不行,可以尝试复制到git的安装目录
git clone [email protected]:~/repo/<reponame>.git
git push -u origin master